Using Search Filters
Search Filters in Stockist allow visitors to find locations on your store locator based on type, features, category, products carried, or any other characteristic.
Search filter basics
- Products carried (e.g. "Shampoo", "Body Wash", and "Curling Iron")
- Product lines (e.g. "Bath Products" and "Fragrances")
- Store features (e.g. "Custom Fitting Services" or "Appointments Available")
- Location type (e.g. "Distributor" or "Retailer")
How filters appear as search options
Each search filter appears as a checkbox underneath the search bar, unless you choose to turn this off when creating the filter. Visitors can select one or more filters to narrow their search to a specific category.
Standalone display
If you have a few filters, they normally appear directly under the search bar:

Dropdown display
You can also choose to have the filters to appear within a dropdown panel. This can be helpful if you have more than 5 filters, to reduce clutter under the search bar:

How filters appear in store listings
Additionally, each store listing can display the associated filters for that store:

Common tasks
Create a filter
To create a filter in your account, open the Settings > Search Filters page of the Stockist dashboard, then click Add search filter and fill out the form that appears:

In the Name field, enter the filter name that will appear to visitors. In the Visibility section, choose whether the filter appears as a search option and/or within the listing of each associated store:

Re-order filters

Apply a filter to a location in the dashboard
Once a filter has been created, you can apply it to one or more stores in your account. When adding or editing a store, select the check box next to the appropriate filter name in the Organization section of the location editor:

Apply a filter to many locations in bulk
You can also apply a filter in bulk to many locations at once - see our article on making bulk updates.
After selecting stores and choosing Make bulk changes, you can select each filter you'd like to change, and then choose whether to apply or remove the filter from the selected stores:

Apply filters to locations when importing a spreadsheet
Stockist supports two formats for assigning filters to locations during an import:
1) Individual filter columns
Add a column to your spreadsheet for each filter you've created in your account. In each row, type Yes in the filter column if the filter applies to that store, otherwise leave the filter column blank (adding "No" is also fine).
For example, if you have filters for "Bath Products" and "Fragrances", your spreadsheet might look like:

When importing your spreadsheet in the app dashboard, on the Identify Columns step, be sure the columns in your file are set to import to the relevant filters in Stockist:

Stockist recognizes these values to apply a filter: Yes, Y, True, T, or 1 (not case sensitive). Any other value (including a blank cell) will be treated as "No".
2) Single filter column
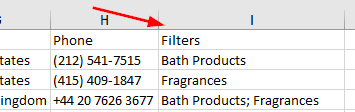
Alternatively, Stockist also supports listing all of the filters for each store in a single column.
To set this up, add a single Filters column, where each row contains the names of the filters to be applied, separated by commas (, ) or semicolons (; ). For example:
When importing your file, make sure your Filters column is matched to the All filters option:

Please note that:
- Filters must be created in your account under Settings > Search filters before starting the import
- The names in this column must exactly match the name of each filter in Stockist, including any punctuation or special characters (not case sensitive)
- Multiple filters must be separated by commas or semicolons
- Each cell must use either commas or semicolons to separate entries, not both
- Any unrecognized values are ignored
- This format doesn't work for filter names that contain semicolons
Each file either have a separate column for each filter, or all filters together in one column, but these formats can't be combined in a single file.
Adjust filter behavior
If a visitor to your store locator selects multiple filters at a single time, Stockist will normally only show stores that match all of the selected filters. If you would prefer to show stores that match any of the selected filters, you can change this under Settings > Search filters > Search filter settings:
