Creating a Google Maps API Key
Stockist uses third-party map providers to power the map imagery in your store locator, and one popular option we support is Google Maps. If you'd like to use Google Maps for the map in your store locator, Google requires that you obtain an "API key" for your website.
The steps below will guide you through creating a Google Maps key. Once created, you'll add this key to your Stockist account so that your store locator can display a map on your site.
Tip: Setting up a Google Maps key can get a little complicated. For a simpler option, we recommend using Mapbox for your store locator instead — it's a lot easier.
A note about Google Maps billing
It's important to note that the Google Maps services are provided directly to your website by Google, not by us (Stockist). Google offers each website a certain level of free map usage every month, which is enough for approximately 10,000 visits to your locator page each month. 99% of Stockist clients use less than Google's free limit, so for most Stockist clients there's no additional cost beyond that of your Stockist plan.
However, Google requires that each website provide billing details in order to use their maps, even if you never use more than the free credit. If your site uses less than the credit, you won't be charged.
After setting up your Google Maps key, we also recommend that you:
- Set up billing alerts with Google to get email notifications about your map usage
- Set up usage quotas with Google to prevent your account from incurring more usage than expected
Quickstart
Google provides a step-by-step 'wizard' to create a key. You can start this with the link below:
You can also access this same quickstart from the Stockist dashboard under Settings > Map provider > Google Maps > Create a Google Maps key.
However, due to limitations on Google's end, this process can only be used once for an account. If you've already set up a Google Maps key before, the process won't be able to complete. In this case, you can follow the steps below.
Creating your key
Follow these steps to create your Google Maps key:
Step 1: Create a Google Cloud Platform account
Open the Google Cloud Console. Sign in with your Google account, or create one if you don't have one.
If this is your first time using Google Cloud, Google will walk you though a short onboarding process. You'll need to accept the Terms of Service and set up a billing account (more on that later).
New accounts receive a $300 credit valid for 90 days. After that credit expires, Google Maps offers an ongoing free tier that's roughly enough for 10,000 visitors to your map each month at no cost.
Step 2: Create a project
Each API key lives inside a "project". Projects help organize your keys, billing, and usage data.
-
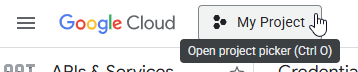
Click the project selector next to the Google Cloud logo:
- Google may already have created you a project named My First Project or something similar:
- If so, use this default project — click the name to select it
- If not, click New project and choose a name like Stockist Map Key

Once done, check the project selector again to make sure the right project is shown.
Step 3: Enable the Google Maps services (APIs)
Next, enable the specific Google Maps services that Stockist uses:
- Open the left sidebar (click the three horizontal bars next to the Google Cloud logo)
- Go to Google Maps Platform > APIs & Services (or click here)
- Click Enable next to each of these services:
- Maps JavaScript API
- Geocoding API
- Places API (New)
Step 4: Set up billing
As mentioned above, Google requires a billing method to use Google Maps on your site, even if your usage stays within their free tier of ~10,000 views/mo.
- In the Google Cloud Console, open the left sidebar and click Billing (or click here)
- Note: Select the main Billing item, not Google Maps Platform > Billing
- Click Link a billing account to connect your project to a billing account
- Create a new billing account if you don't have one
We also recommend that you set up billing alerts and usage quotas to manage your usage.
Step 5: Create your API key
Finally, we can create the actual key you'll use with Stockist:
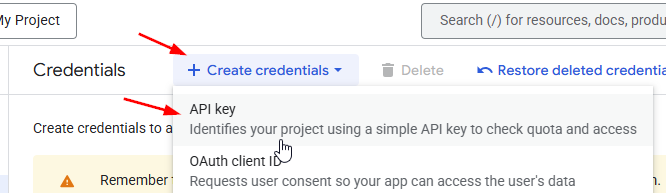
- In the left sidebar of the Google Cloud Console, open APIs & Services > Credentials (or click here)
-
Click Create credentials and choose API key:
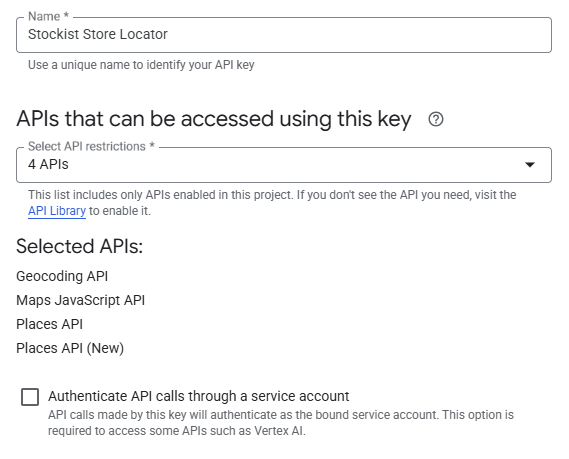
- Pick a memorable name, e.g. Stockist Store Locator
- Under APIs that can be accessed using this key, select:
- Maps JavaScript API
- Geocoding API
- Places API (New)
-
This section should look like:
-
Under Application restrictions, choose Websites and enter:
example.com/**.example.com/*Replace example.com with your actual live website.
-
If you're on Shopify, also enter:
example.myshopify.com/*shopifypreview.com/*Replace example.myshopify.com with your site's myshopify domain.
-
This section should look something like:
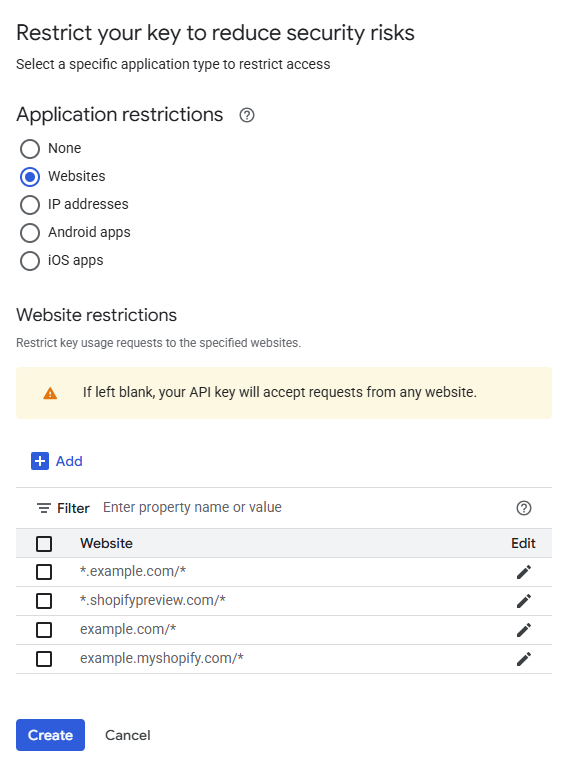
- Click Create to create the key
-
Click Copy to clipboard to copy the new key:
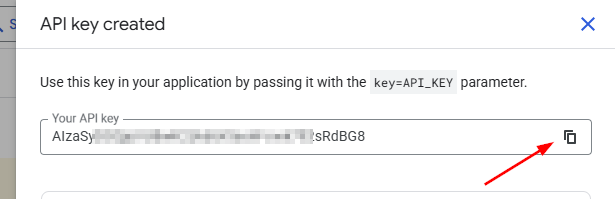
- Paste this key into Stockist under Settings > Map provider > Google Maps.


Important! Please make sure you've filled out the Website restrictions section of your key.
Without this step, someone else could find your map key on your website and use it to make billable requests against your Google account — more details here.
We also strongly recommend setting up usage quotas to limit the usage of your key to a reasonable amount.
Step 6: Activate billing
To ensure you key continues working in the future, look for an Activate button at the top of the Google dashboard and click it:

Without this step, your map will stop working after the initial free credit (90 days or $300). Activating is needed to continue using Google Maps with the ongoing ~10,000 view/mo free tier.
Next steps
We also recommend that you:
- Set up billing alerts with Google to track your map usage
- Set up usage quotas with Google to prevent your account from using more than the free map limit
You can also read more details about how Stockist uses Google Maps and how the free usage limit is calculated.